Pages

Tuesday, June 26, 2012

Refashion Tutorial: Apron from Jeans and a Top

Pin It So I finally get to sit down and write this tutorial down.  As mentioned in my previous post, I was mostly winging it with this project so i will try to be as clear as possible.  It wasn't too complicated, really, so I hope to be as helpful as I can be.

Step 1:  Cut the desired length plus 1/2 inch allowance from a jean leg. Open the leg from the inner seam.  Measurements here are not too stringent.

Step 2:  Fold the piece at the remaining seam to serve as guide.  This will be the center of the apron.  Cut the excess fabric.

Step 3:  I used a bowl to shape the bottom of the apron.  Mark where you will cut.

Step 4:  Cut the corners of the bottom of your apron, including the hem of the jeans.

Step 5:  This is the top that I used for the ruffles.  I chose the bodice portion and cut it so I can measure the strips that I will use.


Step 6:  Measure the perimeter of your apron, except for the top side of the apron.  Multiply that length by 2 and that is the length of the ruffle strips that you will need.  (Although my cloth was not long enough for that.  The beauty of ruffles is that they can be adjusted as you go! So I just made them less ruffly to stretch my fabric.) For the width, I had a 12" wide piece of fabric, so I just folded in half and ironed at the fold.  That makes it easier to cut.  Cut at the fold to end up with 6" wide strips.  Fold each resulting strip in half again and iron at the fold.  This will make it much easier to make the ruffles. Set aside


Step 7:  I used the lining of the top to be the back of my apron.  Use the denim part to mark where you will cut the back part.  Set aside.

 Step 8:  Making the ruffles:  If you ended up with multiple strips to meet the total length needed, sew all the strips together to make one long strip.  Set your tension to zero and the stitches to the longest possible.  Use contrasting thread to distinguish the bobbin thread from the top thread.  Sew your ruffle strips closed with 2 lines of stitches, locking only on one end.  (Sorry for the blurry photo, but I hope you get the idea!)  Pull both bobbin threads on the unlocked end to create the ruffles.  Using two lines of stitches should prevent your ruffles from twisting around.
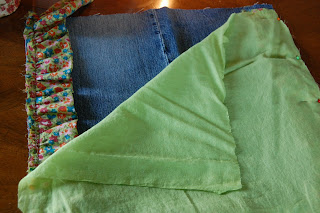
Step 9:  Pin your ruffles around the right side of the apron (do not include the top of the apron), stitched sides pinned to the apron edge.  Sew the ruffles onto the apron.


Step 10:  Pin the backing to the apron, right sides together.  Sew the backing onto the apron, leaving the top part open. Turn right side out.


Step 11:  For the apron waist band and tie, determine how long and wide you want the waist band to be.  I wanted mine to be 1.5" wide to make sure it also covers the top of the back of the apron.  As you can see from the photo above, the front and back of my apron didn't match on top so I had to make sure the waist band is wide enough to cover the top of the back.  Cut strips that are twice as wide as your required width plus 1".  So in my case, (1.5" x 2) plus 1" is a 4" wide strip. Like the ruffles, fold each strip in half lengthwise and iron.  As for the length, measure how long you want it to be.  I just used my tape measure, tying it around my waist.  Sew the strips together if you don't have a long enough piece of the jeans, just as you did the ruffles.
Step 12:  The extra step here is fold and iron the edges of your strips.  The folds should be 1/2". To make sure the sides match, I used the side I already used as a guide for folding and ironing the other side.


 Step 13:  Pin the two sides together and sew the folded side.  Start sewing 1/2" from the end and stop sewing about 1/2" from the other end.

 Step 14:  Align the open side to the top of the apron, sandwiching the top with either side of the waistband.  Pin the waistband onto the top of the apron, making sure that both sides are caught by the pin.


Step 13: Sew the waist band closed.  Again, start sewing 1/2" from the end and stop 1/2" from the other end. From time to time, check to make sure you're catching both top and bottom sides of the waistband closed. It would be terribly inconvenient if you sewed all the way to the end and find out you didn't close your waist band!

Step 14:  Almost there! Cut the corners of your waist band (this is why we left 1/2" on either end not sewn).  Fold the edges into the waist band.

Step 15: (Last step!!!) Sew the ends closed. Whew!
And voila! Enjoy your apron!


Friday, June 22, 2012

Winging It: Apron from Old Pair of Jeans and a Top

Pin It
Just like much of my cooking, I'm pretty much winging it with my sewing.  Here's another recycling project where I used an old pair of my husband's jeans and a top that I never used.  Yes, I am still in a refashion frenzy.  How is it Thursday and I don't remember the last time I actually made a meal?  Apparently, my brain is in sewing mode and is incapable of focusing on much else.

Anyway, tutorial to follow as soon as I sort out the photos that I took.  And like I said, because I was sewing by the seat of my pants, I have to edit out the mistakes I made to make this tutorial more useful! Please check back soon for complete tutorial.

Update: Here's link to the tutorial.  I hope it helps!

Wednesday, June 20, 2012

Pinterest Refashion From Trash To Couture: Men's XL T-Shirt to Women's Dolman Shirt

Pin It Needless to say, I am in a refashion frenzy.  I am determined to do most of the 68 pins on my Sewing Projects board on Pinterest.  Anyway, this is a great tutorial from Trash to Couture that gave me an idea what to do with all those free t-shirts we get from events.  They are usually in men's XL, which is too large for either me or my husband.  So here's the before and after of a shirt I got from a NY Ranger game:

Before

After
I wish I didn't cut the neckline so large because this will only work with either a sports bra or a bathing suit.  At least I'll have something kind of dressy to walk the pup in or a nice cover up for the beach.  For my value-added in this post, a little about making gathers.  My source, again, is the Singer Complete Photo Guide to Sewing.

To make the gathers at the bottom of the shirt, adjust the tension on your machine to zero and the stitch length to the largest.  The book suggests using contrasting thread colors for the bobbin and for the top thread to make it easier to identify the bobbin thread.  The bobbin thread is what you're going to pull to make the gathers.  Sew two parallel lines of 5-6 inches each from the bottom of the shirt.  Lock only where you end sewing.  Don't lock the stitches closest to the bottom of the shirt.  This gives you a side to pull the gathers from, while keeping the other end locked which prevents your gathers from coming undone.  Pull the bobbin thread of both lines you sewed at the same time to make the gathers. Once you've done your gathers, adjust your machine tension and stitch length back to normal.  Sew a line along the gathers you made.  It helps if you have your hands holding the gathers on either side of the presser foot when you sew the lines.  This time, lock the stitches to make sure the gathers are held in place.  This is pretty much the same technique you can use with making ruffles.

Enjoy your shirt!

Monday, June 18, 2012

Refashion: Oversized Yoga Pants to Maxi Skirt

Pin It
For my next project, I decided to say goodbye to my favorite Chinese buffet pants. Sure, they called them yoga pants at Target, but I never used this pair for yoga! Instead, these were always part of my game day outfit--that is, for me and my former roomie, going to a Chinese buffet was a sport.  Of course, you don't want to wear skinny jeans when you're planning on stuffing your face with Peking duck and steamed buns!

Anyway, because I have since been converted into this low sodium, low fat diet, the pants are now too big for me. I thought it would be perfect for my refashion experiments.  So it is now a maxi skirt.

To start, cut the inside seams as shown below:

Turn pants wrong side out.  Then match the outside seams and pin at the bottom to keep from sliding around:


Next pin the cut seams together so you can mark where you're going to sew and cut:


I like to sew and then cut to make sure the garment fits right before I permanently chop off parts of it.  For the front part of the skirt, just sew straight from the top to the bottom.  For the back, start sewing straight from the section of the skirt that will rest on the fullest part of your butt to the bottom of the skirt. Don't worry if your seams don't match at the bottom. You can re-hem the skirt as the last step.  In my case, my pants were so old that the hem was all crooked when I closed the seams so I did have to re-hem the skirt.

As an aside, you will notice that I pin perpendicular to the seams.  This is a tip I got from my sewing bible: the Singer Complete Photo Guide to Sewing.  This makes it easier to remove the pins as you sew and I find actually stabilizes the fabric more than pinning parallel to the seam.

Next, cut the excess fabric off the seams.


Finally, trim the bottom to make a straight hem and sew.  My pants were really long on me so even if I had to cut the original hem, I was still left with a long enough skirt:


And here's the finished product... forgive the cloudy photo as I need to dust my mirror!


This project only took about an hour, considering I had to figure out how to re-shape the pants into a skirt. It might have been quicker if I had a tutorial!

Sunday, June 17, 2012

Salmon in Soy Sauce (Tinuyoang Salmon)

Pin It One of my favorite Filipino dishes is tinuyoan.  Literally translated, it means "soy sauced".  The tinuyoan that I grew up with is made with pork.  Yes, we Filipinos love our pork.  But, again, in my efforts to healthify (I know, it's not a word.) our meals as much as possible, I made it with salmon steak.  Salmon is not the cheapest fish, but I got it for 40% off at the seafood counter.  The health benefits of omega 3 fatty acids are well advertised so I went through a huge salmon phase that the hubby decided to put a stop to.  Although he is careful not to encourage it too much, he actually liked this salmon dish.  And like most of the dishes I make, it took less than 30 minutes and just five ingredients to make.


2 salmon steak cuts (or whatever is on sale)
1 medium white onion
about 1 and 1/2 cooking spoons of soy sauce (I use a Filipino brand:  Marca Pina or Silver Swan, but if you haven't had it, you won't know the difference.)
about 1 cooking spoon of water
black pepper
1 tsp sugar
canola oil

Heat oil in sautee pan. Pan sear both sides of the steak in medium-high heat.  As Anne Burrell put it, the fish will unstick itself when it's ready.  So just sear until the fish unsticks itself.  The fish will still be undercooked at this point. Take the salmon out of the pan and set aside.  Sautee the onions in the same pan only until slightly translucent.  Add soy sauce, water, and sugar.  When sugar has dissolved, add the salmon back and season with black pepper.  Braise in low heat for about 10 minutes just to let the soy sauce flavor the salmon.  Serve over rice.

Tuesday, June 12, 2012

First Pinterest Refashion Project: Work Shirt to Summer Blouse

Pin It Having lost all that grad school weight (20 pounds, to be exact), I am left with relatively nice stuff that are now way too big.  Shopping for new clothes isn't really an option right now, and I actually like sewing so recycling my old clothes was a no-brainer.  (After all of 20 years, I will confess that while my classmates in Home Economics class were swearing at our projects, I was secretly enjoying them.)  So inspired by all the upcycling and refashion projects on Pinterest, I decided to try this particular project from madebylex.com.

The project probably took me a total of five hours to complete, doggie distraction included.  I only did one layer of ruffles, though.  One, because I really didn't want to go overboard with the ruffles, lest I get haunted by nightmares of our very ruffly grammar school uniform.  And more importantly, I found that making the ruffles was actually the hardest step to do! And of, course, because I don't have a serger and I had an incredibly fray-prone fabric, the hemming took some time.  (That's next on my wishlist:  a serger.) Also, I decided not to do the belt.  The shirt's fabric had a pretty nice stretch that hugs the body quite nicely, and I never look good with these fabric belts anyway.

Before

After
I can't deny how proud I am of this.  Although this is not my first refashion, this was the quickest.  I hope I've made my grandma, Nanay Mitang, proud.  After all, I do come from a family of seamstresses!

Crunchy Sweet Chili Shrimp

Pin It


What??? You still don't have Panko in your pantry?! These Japanese bread crumbs simply have the ability to transform a blah dish into something special.  Running out of dinner ideas, I decided to use the same technique in my Baked "Fried" Chicken recipe on shrimp.  The beauty of any shrimp dish is that it is always the quickest dinner you'll ever make.  So for this dish, I used exactly the same flour, egg, and Panko breading that I did with the chicken recipe.  I peeled the shrimp but left out the tail so that I have something to hold on to when I'm breading them.  Bake in a 375-degree preheated oven for about 10-15 minutes until the egg in the breading is visibly cooked (when it is not very yellow anymore).  You will know that the shrimp are cooked when you see that the tails have changed color to orange.  I served this with my favorite sweet chili sauce--Mae Ploy brand, which you can get in most Asian grocery stores--, along with steamed rice and spinach sauteed with garlic and oyster sauce.  Don't worry about getting a whole bottle of this sweet chili sauce.  If you think you'll only be using it for this one dish, you are terribly mistaken.  After you try this, you will be working your menus around this dipping sauce.  It's that good.  This was another inexpensive, quick dinner that the hubby and I both enjoyed as if there was more effort put into it.

Monday, June 4, 2012

There's Always Time for Banana Puddin' Pie!

Pin It And I'm back from my CFA exam hiatus. Hopefully, I pass it so I never have to take the darn thing again!

Anyway, I was obsessing about making this pie the two weeks prior to the exam, my way of finding delicious distraction from all the studying I'd been doing. So despite the test looming, I spent a little time trying this recipe that didn't use instant pudding.  My first try had a great meringue, but my pudding sucked.  It was delicious, but the pudding itself was too soupy.  That was mainly due to my impatience.  I was thinking, it had eggs, it had flour, so maybe it didn't need to be too thick when I poured the pudding over the bananas.  Big mistake.  This is a relatively easy dessert to make, so take the time to actually thicken the pudding into the desired consistency before pouring into the banana.  On my second try a week later (the husband told me I don't wait too long to correct my mistakes), it took about 20 minutes for the pudding to thicken with constant stirring. So the pudding was great, but my meringue wasn't so great.  I might have to wait a little longer for the third try, though.

Meringue from the first attempt

Pudding from the second attempt


So here are the tweaks I made.  For some reason, I have a resistance to making my own pie crust.  So I used ready made crusts for both attempts: shortbread and graham.  I know, I know... I refused to make the pudding with instant mix, but I used store-bought crusts, so sue me.  I find that the shortbread keeps its crunch better than the graham crust so I actually prefer it. 

For the pudding, this recipe was, as the Chopped judges would have put it, cloyingly sweet. I had cut the sugar in half for the first pie, and it was still too sweet for me.  So for the second pie, I only used 1/2 cup plus about 2 teaspoons of sugar for the pudding, and only about 1/8 cup for the meringue.  Also, I used fat free half and half instead of whole milk, which is probably why my first attempt wouldn't thicken.  So I used slightly less half and half and more flour than the recipe.  Two cups of milk made too much pudding for my ready made crusts anyway.  I ended up using 1 and 1/2 cups of half and half, and 1/4 cup plus 1 teaspoon of flour.  Make sure you bring the pudding to a boil before lowering the heat so that your pudding doesn't taste like raw flour.  Finally, I squeezed a little bit of lemon juice onto the bananas to keep them from turning brown.

Even though there was still something to be desired from my second attempt, this is still a delicious and inexpensive dessert that I hope to get right someday.  Heck, I finished the whole of the first soupy pie myself! Hubby couldn't bring himself to eat sweet banana soup.  This is definitely a dessert that must be consumed within two days, so it's best when you're having company.  Even with the lemon juice, the bananas turned brown after some time. Oh, and the pie must have cost less than $5 to make, so it would be a crowd pleaser and a money saver at the same time.