Step 1: Cut the desired length plus 1/2 inch allowance from a jean leg. Open the leg from the inner seam. Measurements here are not too stringent.
Step 2: Fold the piece at the remaining seam to serve as guide. This will be the center of the apron. Cut the excess fabric.
Step 3: I used a bowl to shape the bottom of the apron. Mark where you will cut.
Step 4: Cut the corners of the bottom of your apron, including the hem of the jeans.
Step 5: This is the top that I used for the ruffles. I chose the bodice portion and cut it so I can measure the strips that I will use.
Step 6: Measure the perimeter of your apron, except for the top side of the apron. Multiply that length by 2 and that is the length of the ruffle strips that you will need. (Although my cloth was not long enough for that. The beauty of ruffles is that they can be adjusted as you go! So I just made them less ruffly to stretch my fabric.) For the width, I had a 12" wide piece of fabric, so I just folded in half and ironed at the fold. That makes it easier to cut. Cut at the fold to end up with 6" wide strips. Fold each resulting strip in half again and iron at the fold. This will make it much easier to make the ruffles. Set aside
Step 7: I used the lining of the top to be the back of my apron. Use the denim part to mark where you will cut the back part. Set aside.
Step 8: Making the ruffles: If you ended up with multiple strips to meet the total length needed, sew all the strips together to make one long strip. Set your tension to zero and the stitches to the longest possible. Use contrasting thread to distinguish the bobbin thread from the top thread. Sew your ruffle strips closed with 2 lines of stitches, locking only on one end. (Sorry for the blurry photo, but I hope you get the idea!) Pull both bobbin threads on the unlocked end to create the ruffles. Using two lines of stitches should prevent your ruffles from twisting around.
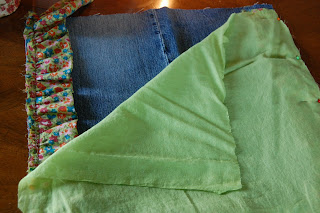
Step 9: Pin your ruffles around the right side of the apron (do not include the top of the apron), stitched sides pinned to the apron edge. Sew the ruffles onto the apron.
Step 10: Pin the backing to the apron, right sides together. Sew the backing onto the apron, leaving the top part open. Turn right side out.
Step 11: For the apron waist band and tie, determine how long and wide you want the waist band to be. I wanted mine to be 1.5" wide to make sure it also covers the top of the back of the apron. As you can see from the photo above, the front and back of my apron didn't match on top so I had to make sure the waist band is wide enough to cover the top of the back. Cut strips that are twice as wide as your required width plus 1". So in my case, (1.5" x 2) plus 1" is a 4" wide strip. Like the ruffles, fold each strip in half lengthwise and iron. As for the length, measure how long you want it to be. I just used my tape measure, tying it around my waist. Sew the strips together if you don't have a long enough piece of the jeans, just as you did the ruffles.
Step 12: The extra step here is fold and iron the edges of your strips. The folds should be 1/2". To make sure the sides match, I used the side I already used as a guide for folding and ironing the other side.
Step 13: Pin the two sides together and sew the folded side. Start sewing 1/2" from the end and stop sewing about 1/2" from the other end.
Step 14: Align the open side to the top of the apron, sandwiching the top with either side of the waistband. Pin the waistband onto the top of the apron, making sure that both sides are caught by the pin.
Step 13: Sew the waist band closed. Again, start sewing 1/2" from the end and stop 1/2" from the other end. From time to time, check to make sure you're catching both top and bottom sides of the waistband closed. It would be terribly inconvenient if you sewed all the way to the end and find out you didn't close your waist band!
Step 15: (Last step!!!) Sew the ends closed. Whew!
And voila! Enjoy your apron!


No comments:
Post a Comment