Monday, December 31, 2012
A Happy New Year to Everyone!
Pin It
This year has been filled with challenges and heartaches for many people. But I also remember the blessings that came to us throughout 2012. I hope to write about our experience with the hurricane soon... And the fact that I finally got a full time job. For now, I wish everyone a very blessed year to come!
Wednesday, August 15, 2012
Pinterest Project: Hammock Seat Cover for the Pup
Pin It
Needless to say, this blog has been neglected. I live very close to a beach town and so it seems that everything happens in the summer. Come the colder months, it seems almost like a ghost town! Thunderstorms made today an indoor day and I take advantage.
This is a project I completed about a month ago and inspired by a pin originally from the blog, excapes. Total cost of materials probably adds up to $40. Now, I know there are less expensive hammock seat covers that can be purchased online (especially since I got my materials full price) but I went for this project anyway. First of all, I was pretty excited to make it. Then, the reviews for the less expensive ones online seem to consistently comment on the chemical smell. Now my pup's hammock smells like Downy, just as he likes his bedding to be.
I had followed most of the instructions. But since our puppy is going to be a bigger dog (he's nearly 50 pounds at 10 months) than the blogger's, I decided to use a stronger canvass fabric that I got from Amazon and make some reinforcements. This is not at all waterproof, but may be a little bit resistant to moisture due to the two thick canvass fabrics on top of each other. Our Cally gets nauseous in the car and the excessive drooling does not soak through (we're talking drool fangs here) . I also believe that the hammock style has helped the pup relax in the car because he doesn't look like he has trouble balancing in the back seat. He used to look so stressed and moved around so much when he could see the car floor. Although he still drools, he is now able to just sit calmly in the back seat.
So here's the reinforcement that I was talking about:
So far, it's holding up and keeping the pup calm and the back seat relatively clean (except for the mess that us humans make!). This was a fun and definitely useful project.
 |
| The seat cover on our love seat. Photos with it used in the beach car would not have been very pretty. :-) |
This is a project I completed about a month ago and inspired by a pin originally from the blog, excapes. Total cost of materials probably adds up to $40. Now, I know there are less expensive hammock seat covers that can be purchased online (especially since I got my materials full price) but I went for this project anyway. First of all, I was pretty excited to make it. Then, the reviews for the less expensive ones online seem to consistently comment on the chemical smell. Now my pup's hammock smells like Downy, just as he likes his bedding to be.
 |
| The bub checking out his seat cover. |
So here's the reinforcement that I was talking about:
 |
| I just cut extra fabric and sewed it onto the back of the handles. |
Monday, July 30, 2012
Summertime Eats: Tuna Ceviche
Pin It
Well, maybe I can eat this all year round. But this is just a perfectly light yet flavorful appetizer for the summer. It's also another dish you can make with frozen tuna. Now frozen is obviously of a much lower quality than sushi-grade tuna, that's why it's so much cheaper. But because you are basically cooking the fish with acid instead of heat, any fishiness from the frozen tuna will be cleaned away by the fresh lemons and limes that you'll be using.

about a pound of frozen tuna, sliced into 1/2 inch cubes
1 medium white onion, chopped
juices of 1 lemon and 1 lime
fresh cilantro (about 1/2 cup chopped)
salt and pepper
red pepper flakes
Mix tuna, onion, lemon and lime juices, and cilantro together. Season with salt and pepper. Add red pepper flakes (or even chopped jalapeno pepper) according to heat preference. Mix and let sit in the fridge overnight for maximum flavor infusion. Serve with tortilla chips.
Pinteresting a Welcome Barbecue
Pin It
It's been quite a while since I last blogged. I don't know what happened to the past three weeks! Anyway, last week was definitely a hectic one as one of my best friends from the Philippines came over for a visit. Naturally, because it is her first time in the US, she had to be taken on a whirlwind tour of NYC. I'll save the tips on how we did it way under her budget for another post.
Ever since I got hooked on Pinterest, I had sworn that I would try to do as much of the pins as I can. I found the perfect opportunity to do so when we had an intimate barbecue to welcome my friend to NY. While I decided to keep it simple by having a salad, burgers and hotdogs for the main "entree", I (with a lot of help from our guest!) put a little more effort on the appetizers and dessert.
For starters, we had tuna ceviche (recipe in the next post), chips with mango salsa (recipe here), and my Pinterest-inspired mini tacos. I topped off the mini tacos with mango salsa and they were incredibly easy to assemble and looked impressive on the table. We made the taco-seasoned ground turkey and mango salsa a day before so we only needed to assemble it before the party.

Finally for dessert, we made what would be my third attempt at banana pudding pie, coconut cupcakes a la Ina Garten frosted via Pinterest instructions, and another Pinterest-inspired dessert of red velvet brownies.
I followed the red velvet brownie recipe to the letter, except I took them out of the oven about 5 minutes earlier because of the much warmer weather. They were just fine. Also, the recipe calls for a white chocolate frosting, which I'm not a big fan of because I find it way too sweet. So I decided to use Ina Garten's cream cheese frosting, along with some changes as I wrote here. I also used 1/3 less fat Philadelphia neufchatel cream cheese with no noticeable change in flavor.
All desserts, except for the banana pudding pie, were done ahead of the party so there really wasn't much to do on the day itself. And most importantly, everybody seemed to enjoy our little gathering and we had an awesome time reminiscing about high school.
Ever since I got hooked on Pinterest, I had sworn that I would try to do as much of the pins as I can. I found the perfect opportunity to do so when we had an intimate barbecue to welcome my friend to NY. While I decided to keep it simple by having a salad, burgers and hotdogs for the main "entree", I (with a lot of help from our guest!) put a little more effort on the appetizers and dessert.
For starters, we had tuna ceviche (recipe in the next post), chips with mango salsa (recipe here), and my Pinterest-inspired mini tacos. I topped off the mini tacos with mango salsa and they were incredibly easy to assemble and looked impressive on the table. We made the taco-seasoned ground turkey and mango salsa a day before so we only needed to assemble it before the party.

Finally for dessert, we made what would be my third attempt at banana pudding pie, coconut cupcakes a la Ina Garten frosted via Pinterest instructions, and another Pinterest-inspired dessert of red velvet brownies.
 |
| The photo sucks... and so does my frosting skills. But I imagine with practice and a little bit more generosity with the frosting, my cupcakes will be much prettier in time. |
All desserts, except for the banana pudding pie, were done ahead of the party so there really wasn't much to do on the day itself. And most importantly, everybody seemed to enjoy our little gathering and we had an awesome time reminiscing about high school.
Thursday, July 12, 2012
Pinterest-Inspired Fabric Basket
Pin It
I am in a sewing frenzy! And it's good...
Having scraps of canvass from the doggie hammock seat cover that I'm making (also Pinterest-inspired) and fabric from my damask window panels, I thought these would be perfect for a fabric basket. This would be a cute storage for our doggie poop bags that we buy by the case. And it would be coordinated with my window panels! We got them months ago and were still sitting in the original box they came in. Not very attractive. For the body, I mostly followed the instructions from Pink Penguin, with a few modifications. I wanted the damask to also accent the top of the basket but didn't have enough fabric to actually make a lining out of it. So I basically made a bias out of the damask fabric to close the top of the basket and used an old men's shirt as lining. And because I wanted it to be a hanging basket, I changed the handle as shown below.
 I didn't have batting, so I used Pellon woven fusible interfacing, which was all I had. But because the canvass I used was thick, the basket is able to hold its shape pretty well as you can see in the photo below. As a value-added to the Pink Penguin tutorial, you know how Land's End canvass bags can stand sturdily on their own? I believe the trick is not to cut the corners of the box ends. What I did was I folded them up and sewed the corners to the side seams. I did this both for the lining and the main basket. As you can see, my basket stands up without a problem! So with a few changes, you can definitely use these techniques to make your own sturdy tote! If I had a serger, I wouldn't even need the interfacing and the lining to make a tote.
 Now once I hung the basket on the wall and actually put stuff in it, it was drooping. But that was easily resolved with a cardboard at the bottom of the basket.

It feels awesome to actually create something from all these scrap materials! Why don't you try it?
Having scraps of canvass from the doggie hammock seat cover that I'm making (also Pinterest-inspired) and fabric from my damask window panels, I thought these would be perfect for a fabric basket. This would be a cute storage for our doggie poop bags that we buy by the case. And it would be coordinated with my window panels! We got them months ago and were still sitting in the original box they came in. Not very attractive. For the body, I mostly followed the instructions from Pink Penguin, with a few modifications. I wanted the damask to also accent the top of the basket but didn't have enough fabric to actually make a lining out of it. So I basically made a bias out of the damask fabric to close the top of the basket and used an old men's shirt as lining. And because I wanted it to be a hanging basket, I changed the handle as shown below.


It feels awesome to actually create something from all these scrap materials! Why don't you try it?
Wednesday, July 11, 2012
Sharing Another Men's Shirt Refashion
Pin It
I scored a couple of good fabrics from my hubby's recent purge. A great one was this linen shirt that would be perfect for a summer top. Using a combination of techniques that I've practiced with my previous projects, I came up with this simple top that was relatively easy to make. I wish I had spent more time with the measurements, though, as I screwed it up somehow and now I need a solution to the front giving a little peek-a-boo.
 |
| After |
 |
| Before (It's inside out as I was too lazy to turn it back when I realized I forgot to take a photo.) |
Quick Fix to a Weird Top Length
Pin It
I got a top/dress at Target years ago and I've used it once. The dress almost looks like a mumu because of its awkward length. It was probably made for taller people as a tunic top, so it just doesn't work for my height. The halter neckline has some interesting embroidery that just made me hesitant to get rid of it. I've finally figured out a simple solution: elastic!
 Measure length from your armpit to your waistline. Now measure from the armpit of the top to 2 inches longer than the first measurement. Mark and cut across. So for instance, if the length from your armpit to the waistline is 13
inches, then cut 15 inches below the armpit of the garment.
Measure length from your armpit to your waistline. Now measure from the armpit of the top to 2 inches longer than the first measurement. Mark and cut across. So for instance, if the length from your armpit to the waistline is 13
inches, then cut 15 inches below the armpit of the garment.

Fold hem about 1/2 inch and sew.

Cut a slit inside the hem to insert elastic.

I used a 1/4-inch elastic and measured 2 inches less than my waistline. So if your waistline is 24 inches (good for you!), then the length of your elastic should be 22 inches. You don't want it too short unless you want to feel like a sausage. Attach a safety pin to one end while holding onto the other end of the elastic. Try to keep the elastic flat as you snake it through the hem. Sew the ends of the elastic together.

Distribute the fabric along the elastic, making sure that the elastic is flat throughout. Sew the elastic in place on either side of the hem.

Enjoy your new summer top! This project seriously took much less time than writing this tutorial--10 minutes tops. The quickest I've done so far!
 |
| This is the After. |


Fold hem about 1/2 inch and sew.

Cut a slit inside the hem to insert elastic.

I used a 1/4-inch elastic and measured 2 inches less than my waistline. So if your waistline is 24 inches (good for you!), then the length of your elastic should be 22 inches. You don't want it too short unless you want to feel like a sausage. Attach a safety pin to one end while holding onto the other end of the elastic. Try to keep the elastic flat as you snake it through the hem. Sew the ends of the elastic together.

Distribute the fabric along the elastic, making sure that the elastic is flat throughout. Sew the elastic in place on either side of the hem.

Enjoy your new summer top! This project seriously took much less time than writing this tutorial--10 minutes tops. The quickest I've done so far!
Friday, July 6, 2012
The Most Delicious Chicken Dish in the World...
Pin It
... As some have described, according to Mark Bittman in How to Cook Everything. Arguably, the ubiquitous adobo may very well be the national dish of the Philippines. The dish is undoubtedly a hand me down from the 300 something years of Spanish colonization, but we have taken it as our own. For years, I have been trying to perfect this and I've finally come up with my own version that I LOVE! As my husband so eloquently put it, "This is good... stuff (let's just say the actual word is acceptable only on cable TV)". Hey, this is New York.
For the unfamiliar, there are only two basic ingredients to make this dish: garlic and vinegar. The list of proteins or vegetables that will be cooked in it is pretty much endless. Based on my observation, pork and chicken are the most popular. In fact, the combination of the two has been aptly nicknamed CPA (chicken-pork adobo). One of my favorites is our nanny's pork and my grandmother's squid adobo made with its ink. Each region in the country will have its own version of the dish. I grew up with meat adobo that is also braised in soy sauce. I use Filipino soy sauce (Marca Pina or Silver Swan) because it just isn't the same without it. Filipino soy sauce is probably somewhere between the darker Chinese sauce like La Choy and the lighter Japanese Kikkoman. I would probably prefer Kikkoman if I couldn't get the Filipino soy sauce.
Given that there are so few ingredients, it is important to get those few steps right. For instance, while you would often hear that the garlic should NOT be browned in Western cooking, the flavor of the adobo will not be the same if the garlic is not browned. We Filipinos love our toasted garlic. Also, traditionally, a meat adobo is braised in the liquid, fried to give it some crunch, then placed back into the sauce. How can you not love this dish??? However, again, in an effort to achieve the same flavors but make it a little bit healthier, I have changed the steps around using some of the techniques I've seen on all those Food Network shows.
So, here's my version of the best chicken dish I've ever made:

4 chicken thighs (Got them on sale for 99 cents a pound!)
5 cloves of garlic, minced (It is a lot, but that's how we roll.)
soy sauce
white vinegar
water
fresh black pepper
one bay leaf (optional--I do opt out of this, but some people like it.)
So instead of frying as the last step, I rendered out the fat from the chicken skin first before braising. In an oven-safe sautee pan, heat a little bit of canola oil over medium high, just enough so the chicken will not stick to the pan (You don't need a lot as the thigh has a lot of its own fat). When the oil is hot enough, put the chicken, skin side down, into the oil. Turn the chicken over once the skin is golden brown. Remove the chicken from the pan once the other side is slightly browned and set aside. (Although the next step is heart-breaking for me, it is necessary to make the dish slightly healthier). Spoon out and discard the rendered fat from the pan, leaving just enough to sautee the garlic in.
Pre-heat the oven to 350 degrees Farenheit. In the same pan, brown the garlic (make sure it's brown, not burnt). Add one part vinegar to two parts soy sauce once garlic is browned (I just use a cooking spoon to measure these. The liquid should not cover the chicken skin that you just crisped up.). Let the mixture boil without stirring (very important as the vinegar won't cook--I don't know the scientific explanation but it seems to be true!). Reduce to a simmer and taste. If it's too salty, which it will likely be, add some water (about 2 parts for me). Add the chicken back, skin side up. Season with a lot of black pepper. Simmer, uncovered, for about 15 minutes. Add more water if the liquid starts to dry out. Put the pan in the oven for about 20 minutes to finish cooking. The chicken is done if juices run clear when poked with a knife. Serve over rice and enjoy!
Note: This version actually also has slightly reduced sodium. The original recipe from our nanny required 3 parts soy sauce to 1 part vinegar. But because of the simmering and finishing in the oven in this case, the soy sauce becomes so concentrated that you don't need as much. So don't worry if you initially add too much water and you seem to have diluted the flavor. Also, this dish keeps so well and is also better as a leftover. We Filipinos love to have it for breakfast over garlic fried rice and egg.
Tuesday, June 26, 2012
Refashion Tutorial: Apron from Jeans and a Top
Pin It
So I finally get to sit down and write this tutorial down. As mentioned in my previous post, I was mostly winging it with this project so i will try to be as clear as possible. It wasn't too complicated, really, so I hope to be as helpful as I can be.
Step 1: Cut the desired length plus 1/2 inch allowance from a jean leg. Open the leg from the inner seam. Measurements here are not too stringent.
 Step 2: Fold the piece at the remaining seam to serve as guide. This will be the center of the apron. Cut the excess fabric.
 Step 3: I used a bowl to shape the bottom of the apron. Mark where you will cut.
 Step 4: Cut the corners of the bottom of your apron, including the hem of the jeans.
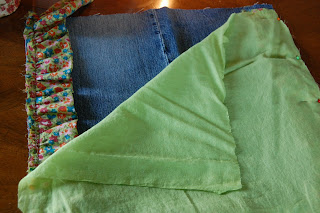
 Step 5: This is the top that I used for the ruffles. I chose the bodice portion and cut it so I can measure the strips that I will use.

 Step 6: Measure the perimeter of your apron, except for the top side of the apron. Multiply that length by 2 and that is the length of the ruffle strips that you will need. (Although my cloth was not long enough for that. The beauty of ruffles is that they can be adjusted as you go! So I just made them less ruffly to stretch my fabric.) For the width, I had a 12" wide piece of fabric, so I just folded in half and ironed at the fold. That makes it easier to cut. Cut at the fold to end up with 6" wide strips. Fold each resulting strip in half again and iron at the fold. This will make it much easier to make the ruffles. Set aside


Step 7: I used the lining of the top to be the back of my apron. Use the denim part to mark where you will cut the back part. Set aside.
 Step 8: Making the ruffles: If you ended up with multiple strips to meet the total length needed, sew all the strips together to make one long strip. Set your tension to zero and the stitches to the longest possible. Use contrasting thread to distinguish the bobbin thread from the top thread. Sew your ruffle strips closed with 2 lines of stitches, locking only on one end. (Sorry for the blurry photo, but I hope you get the idea!) Pull both bobbin threads on the unlocked end to create the ruffles. Using two lines of stitches should prevent your ruffles from twisting around.
 Step 9: Pin your ruffles around the right side of the apron (do not include the top of the apron), stitched sides pinned to the apron edge. Sew the ruffles onto the apron.

 Step 10: Pin the backing to the apron, right sides together. Sew the backing onto the apron, leaving the top part open. Turn right side out.

 Step 11: For the apron waist band and tie, determine how long and wide you want the waist band to be. I wanted mine to be 1.5" wide to make sure it also covers the top of the back of the apron. As you can see from the photo above, the front and back of my apron didn't match on top so I had to make sure the waist band is wide enough to cover the top of the back. Cut strips that are twice as wide as your required width plus 1". So in my case, (1.5" x 2) plus 1" is a 4" wide strip. Like the ruffles, fold each strip in half lengthwise and iron. As for the length, measure how long you want it to be. I just used my tape measure, tying it around my waist. Sew the strips together if you don't have a long enough piece of the jeans, just as you did the ruffles.
 Step 12: The extra step here is fold and iron the edges of your strips. The folds should be 1/2". To make sure the sides match, I used the side I already used as a guide for folding and ironing the other side.


Step 13: Sew the waist band closed. Again, start sewing 1/2" from the end and stop 1/2" from the other end. From time to time, check to make sure you're catching both top and bottom sides of the waistband closed. It would be terribly inconvenient if you sewed all the way to the end and find out you didn't close your waist band!
 Step 14: Almost there! Cut the corners of your waist band (this is why we left 1/2" on either end not sewn). Fold the edges into the waist band.


 And voila! Enjoy your apron!

Step 1: Cut the desired length plus 1/2 inch allowance from a jean leg. Open the leg from the inner seam. Measurements here are not too stringent.


Step 7: I used the lining of the top to be the back of my apron. Use the denim part to mark where you will cut the back part. Set aside.


Step 13: Pin the two sides together and sew the folded side. Start sewing 1/2" from the end and stop sewing about 1/2" from the other end.


Step 14: Align the open side to the top of the apron, sandwiching the top with either side of the waistband. Pin the waistband onto the top of the apron, making sure that both sides are caught by the pin.


Step 13: Sew the waist band closed. Again, start sewing 1/2" from the end and stop 1/2" from the other end. From time to time, check to make sure you're catching both top and bottom sides of the waistband closed. It would be terribly inconvenient if you sewed all the way to the end and find out you didn't close your waist band!


Step 15: (Last step!!!) Sew the ends closed. Whew!


Friday, June 22, 2012
Winging It: Apron from Old Pair of Jeans and a Top
Pin It
 Just like much of my cooking, I'm pretty much winging it with my sewing. Here's another recycling project where I used an old pair of my husband's jeans and a top that I never used. Yes, I am still in a refashion frenzy. How is it Thursday and I don't remember the last time I actually made a meal? Apparently, my brain is in sewing mode and is incapable of focusing on much else.
Anyway, tutorial to follow as soon as I sort out the photos that I took. And like I said, because I was sewing by the seat of my pants, I have to edit out the mistakes I made to make this tutorial more useful! Please check back soon for complete tutorial.
Update: Here's link to the tutorial. I hope it helps!
Wednesday, June 20, 2012
Pinterest Refashion From Trash To Couture: Men's XL T-Shirt to Women's Dolman Shirt
Pin It
Needless to say, I am in a refashion frenzy. I am determined to do most of the 68 pins on my Sewing Projects board on Pinterest. Anyway, this is a great tutorial from Trash to Couture that gave me an idea what to do with all those free t-shirts we get from events. They are usually in men's XL, which is too large for either me or my husband. So here's the before and after of a shirt I got from a NY Ranger game:
I wish I didn't cut the neckline so large because this will only work with either a sports bra or a bathing suit. At least I'll have something kind of dressy to walk the pup in or a nice cover up for the beach. For my value-added in this post, a little about making gathers. My source, again, is the Singer Complete Photo Guide to Sewing.
To make the gathers at the bottom of the shirt, adjust the tension on your machine to zero and the stitch length to the largest. The book suggests using contrasting thread colors for the bobbin and for the top thread to make it easier to identify the bobbin thread. The bobbin thread is what you're going to pull to make the gathers. Sew two parallel lines of 5-6 inches each from the bottom of the shirt. Lock only where you end sewing. Don't lock the stitches closest to the bottom of the shirt. This gives you a side to pull the gathers from, while keeping the other end locked which prevents your gathers from coming undone. Pull the bobbin thread of both lines you sewed at the same time to make the gathers. Once you've done your gathers, adjust your machine tension and stitch length back to normal. Sew a line along the gathers you made. It helps if you have your hands holding the gathers on either side of the presser foot when you sew the lines. This time, lock the stitches to make sure the gathers are held in place. This is pretty much the same technique you can use with making ruffles.
Enjoy your shirt!
 |
| Before |
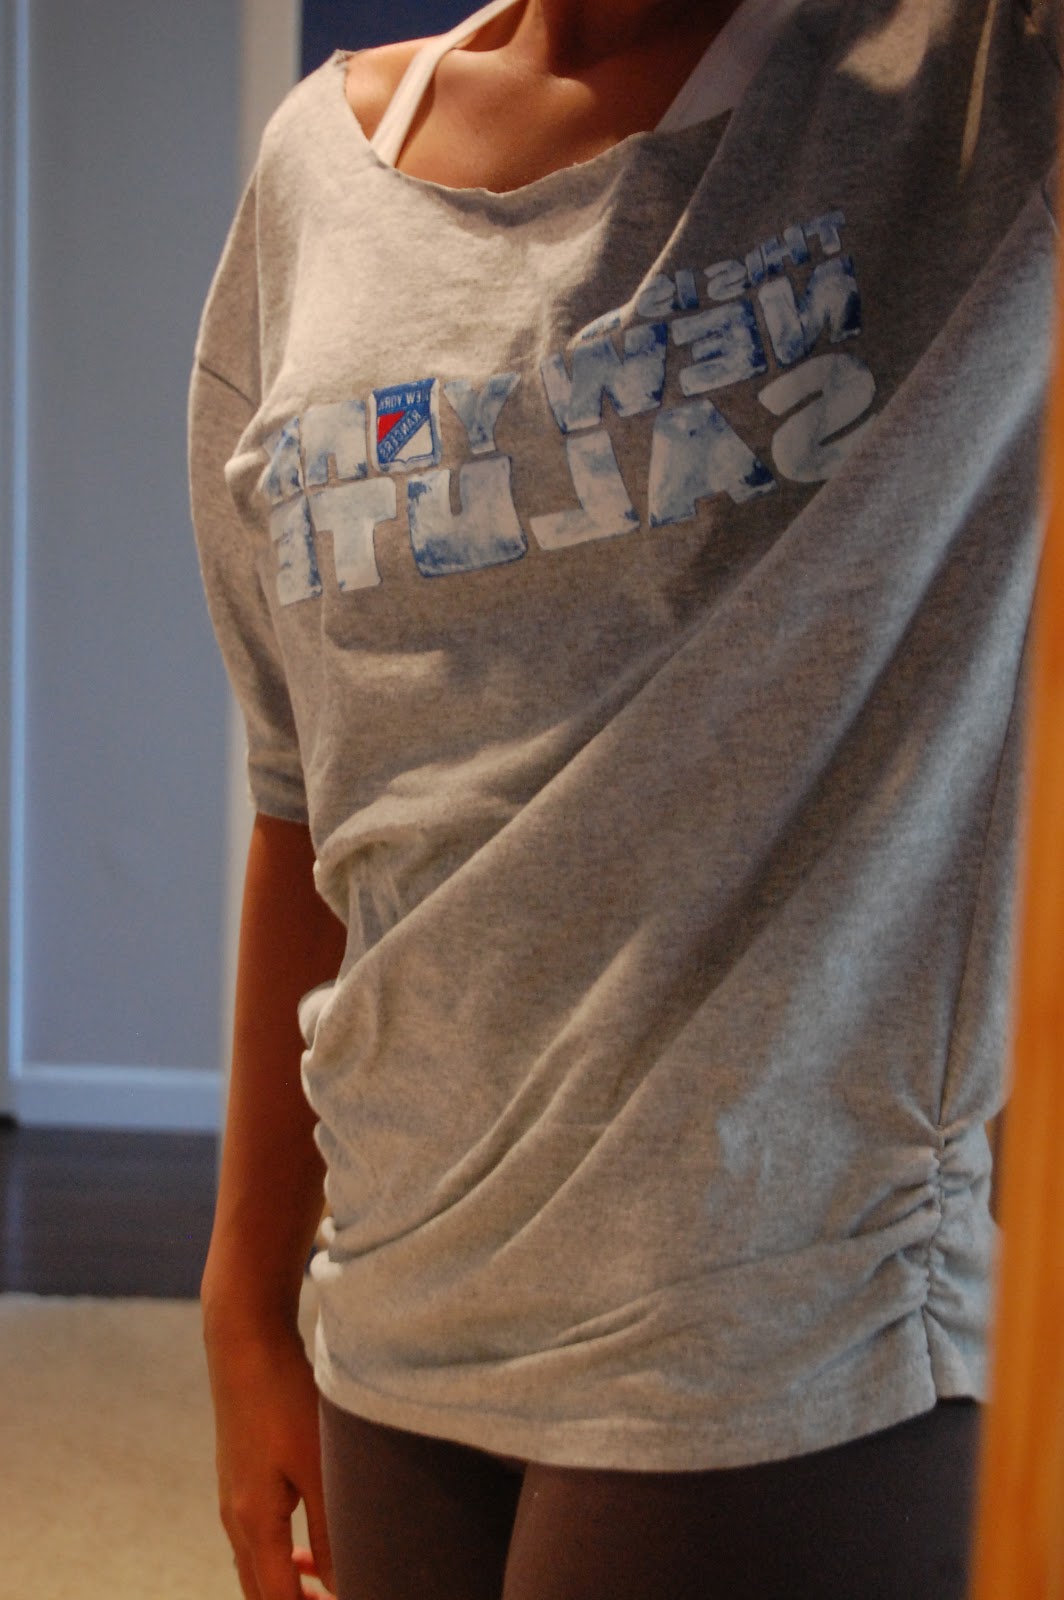 |
| After |
To make the gathers at the bottom of the shirt, adjust the tension on your machine to zero and the stitch length to the largest. The book suggests using contrasting thread colors for the bobbin and for the top thread to make it easier to identify the bobbin thread. The bobbin thread is what you're going to pull to make the gathers. Sew two parallel lines of 5-6 inches each from the bottom of the shirt. Lock only where you end sewing. Don't lock the stitches closest to the bottom of the shirt. This gives you a side to pull the gathers from, while keeping the other end locked which prevents your gathers from coming undone. Pull the bobbin thread of both lines you sewed at the same time to make the gathers. Once you've done your gathers, adjust your machine tension and stitch length back to normal. Sew a line along the gathers you made. It helps if you have your hands holding the gathers on either side of the presser foot when you sew the lines. This time, lock the stitches to make sure the gathers are held in place. This is pretty much the same technique you can use with making ruffles.
Enjoy your shirt!
Monday, June 18, 2012
Refashion: Oversized Yoga Pants to Maxi Skirt
Pin It
 For my next project, I decided to say goodbye to my favorite Chinese buffet pants. Sure, they called them yoga pants at Target, but I never used this pair for yoga! Instead, these were always part of my game day outfit--that is, for me and my former roomie, going to a Chinese buffet was a sport. Of course, you don't want to wear skinny jeans when you're planning on stuffing your face with Peking duck and steamed buns!
Anyway, because I have since been converted into this low sodium, low fat diet, the pants are now too big for me. I thought it would be perfect for my refashion experiments. So it is now a maxi skirt.
To start, cut the inside seams as shown below:
 Turn pants wrong side out. Then match the outside seams and pin at the bottom to keep from sliding around:


I like to sew and then cut to make sure the garment fits right before I permanently chop off parts of it. For the front part of the skirt, just sew straight from the top to the bottom. For the back, start sewing straight from the section of the skirt that will rest on the fullest part of your butt to the bottom of the skirt. Don't worry if your seams don't match at the bottom. You can re-hem the skirt as the last step. In my case, my pants were so old that the hem was all crooked when I closed the seams so I did have to re-hem the skirt.
 As an aside, you will notice that I pin perpendicular to the seams. This is a tip I got from my sewing bible: the Singer Complete Photo Guide to Sewing. This makes it easier to remove the pins as you sew and I find actually stabilizes the fabric more than pinning parallel to the seam.
Next, cut the excess fabric off the seams.

Finally, trim the bottom to make a straight hem and sew. My pants were really long on me so even if I had to cut the original hem, I was still left with a long enough skirt:

And here's the finished product... forgive the cloudy photo as I need to dust my mirror!

This project only took about an hour, considering I had to figure out how to re-shape the pants into a skirt. It might have been quicker if I had a tutorial!

Anyway, because I have since been converted into this low sodium, low fat diet, the pants are now too big for me. I thought it would be perfect for my refashion experiments. So it is now a maxi skirt.
To start, cut the inside seams as shown below:


Next pin the cut seams together so you can mark where you're going to sew and cut:


Next, cut the excess fabric off the seams.

Finally, trim the bottom to make a straight hem and sew. My pants were really long on me so even if I had to cut the original hem, I was still left with a long enough skirt:

And here's the finished product... forgive the cloudy photo as I need to dust my mirror!

This project only took about an hour, considering I had to figure out how to re-shape the pants into a skirt. It might have been quicker if I had a tutorial!
Subscribe to:
Posts (Atom)